Hosting a password manager? Why and how (vaultwarden)
In the modern era, where our lives are increasingly intertwined with technology, the need for robust digital security has become more crucial than ever. One of the fundamental aspects of securing our online presence lies in the effective management of passwords. With the multitude of online accounts and services we use on a daily basis, it has become almost impossible to remember unique and strong passwords for each one. This is where password managers come into play, offering a convenient and secure solution to this ongoing challenge.
What is it?
A password manager is an application that securely stores and manages all your passwords in a centralized location. It eliminates the need to remember multiple passwords by storing them in an encrypted database that can be accessed with a single master password or authentication method. This approach provides numerous advantages over traditional password management methods.
First and foremost, using a password manager greatly enhances security. With a password manager, you can generate long, complex, and unique passwords for each of your online accounts without the fear of forgetting them. This eliminates the common practice of using weak or easily guessable passwords across multiple platforms, which is a major vulnerability. By employing strong, unique passwords, the risk of unauthorized access to your accounts is significantly reduced, protecting your sensitive data and personal information.
Why self-host it?
Moreover, hosting a password manager yourself offers additional benefits in terms of control and privacy. While there are cloud-based password managers available, hosting your own password manager gives you full control over your data. You don’t have to rely on a third-party service or trust them with the security of your passwords. By hosting it on your own server or device, you can ensure that your passwords are stored and encrypted locally, reducing the possibility of data breaches. (LastPass, a famous password manager, has been breached multiple times.)
Another advantage of self-hosted password managers is the ability to customize and tailor the system to your specific needs. You can choose the encryption algorithms and security measures that you trust, ensuring the highest level of protection for your passwords. Additionally, self-hosted solutions often allow for seamless integration with other security tools and practices, such as multi-factor authentication, further fortifying your digital fortress.
How much will it cost me?
It depends. From basically free to a really expensive dedicated server. You are fine.
We are going to use Vaultwarden, a Rust-written implementation of Bitwarden. It is very resource-saving. Basically, any server that runs Docker and Nginx can run it. (Yes dude, we are going Docker!)
In our case, this server from Vultr is perfectly good for password manager. Actually, if you don’t apply for the free tier, the cheapest 2.5$ IPv6-only plan will also work! We are going to use Cloudflare, so it doesn’t matter if you don’t have an IPv6 address everywhere (with that said, you still need an IPv6 address in order to configure the server). Also, free servers from Microsoft Azure, Amazon Web Services, Google Cloud Platform, and Oracle Cloud Infrastructure… are all good choices. Just remember to choose someone who is reputable since you are putting your most important stuff on it. (The password manager’s database is encrypted at rest, so don’t worry too much)
You can also use a Raspberry Pi or Synology NAS, etc. to host your password manager. In fact, this is the most suitable option since it is in your local area network, which means no one can even know there is a password manager, instead of exposing it to the public Internet. You can use software like Tailscale, WireGuard, and ZeroTier to access your server outside.
Also, you need a domain name (which you can get from any registrar like Google, Namecheap, Cloudflare, Porkbun, Cosmotown, etc. for cheap), and point it to Cloudflare. We will not mention it here.
Note that for this guide, it is needed to make your server’s operating system Ubuntu 22.04 LTS/Debian 11 or higher.
Enough talking, let’s get started.
Let’s assume we are going to host the server in Vultr, our domain name will be password.orwtmc.eu.org (eu.org domains can be got for free for anyone.)
Go to Cloudflare console and add an A record, pointing it to your server (If you are using an IPv6-only server, then please choose AAAA), leave the cloud orange, which says “Proxied”. And save it.
Next, SSH to your server and use the following command to install Docker.
sudo apt update
sudo apt install curl
curl -fsSL get.docker.com | sudo bash
After it is done, use mkdir vaultwarden to create a working directory for vaultwarden. And use your favorite editor to create a file named docker-compose.yml, and paste the following lines to it. IMPORTANT: Please use the root user to do this, otherwise Vaultwarden will refuse to start. Use sudo -i to switch to the root user.
version: '3.3'
services:
    server:
        restart: always
        container_name: vaultwarden
        environment:
            - ADMIN_TOKEN=12345678
            - 'DOMAIN=https://password.orwtmc.eu.org'
        volumes:
            - '/vw-data/:/data/'
        ports:
            - '65000:80'
        image: 'vaultwarden/server:latest'
Replace the DOMAIN section with your own domain, and replace ADMIN_TOKEN with something which is really secure. (This is for managing the entire server, so make it secure, but having this token will not have access to your passwords.)
Use openssl rand -hex 32 to generate a super secure token for it.
Then, save the file, and use the command docker compose up -d to fire up the container.
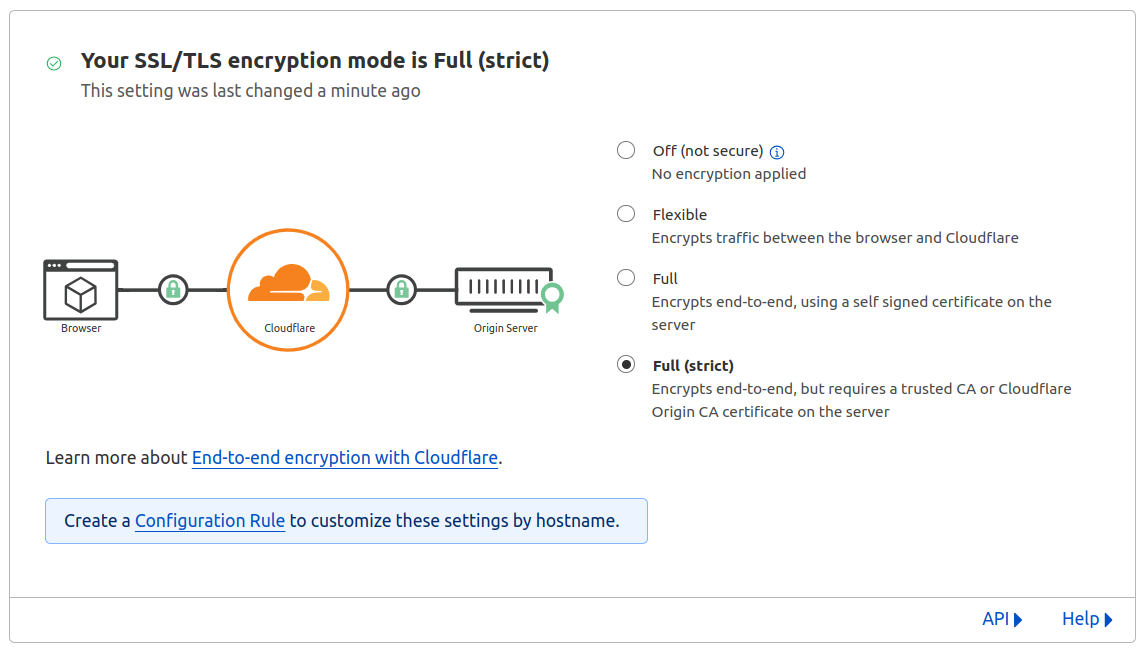
Now the server is up and running, it is time to configure the access. We will need a TLS certificate, which don’t worry, we will get it from CloudFlare Origin CA. But before that, you need to check if your domain’s SSL/TLS is properly configured. So go to the Cloudflare console and select your domain. On the left side panel, choose SSL/TLS and Overview. Yours might be stated ‘Flexible’, that is not right. We need to change it to ‘Full (strict)’.
After that, go to Origin Server, and click “Create Certificate”. Change the private key type to ECC, which offers much faster speed and less resource consumption, and set the validity to 15 years. Click Create.
Make sure the key type is PEM. Copy and paste both the public key and the private key into two files. We need it later.
Now go back to your server’s console, and use sudo apt install nginx -y to install Nginx.
Now use cd /etc/nginx && mkdir certs && cd certs to create a directory that will store the certificates we have just created. Use your favorite editor to create two files, one is ‘public.pem’, and the other is ‘private.pem’. Copy the certificate to public.pem and private key to private.pem. It will look like this (in the picture, only the first 1 and 2 lines are displayed because the private key is completely confidential to everyone.)

After that, use cd ../conf.d to go to the configuration folder. Use your favorite editor to create a file named ‘vault.conf’, and paste the following lines to your file.
server {
	listen 80;
	return 301 https://$host$request_uri;
}

server {
	listen 443 ssl;
	server_name password.orwtmc.eu.org;
	ssl_certificate /etc/nginx/certs/public.pem;
	ssl_certificate_key /etc/nginx/certs/private.pem;
	ssl_protocols TLSv1 TLSv1.1 TLSv1.2 TLSv1.3;
	ssl_ciphers HIGH:!aNULL:!eNULL:!EXPORT:!CAMELLIA:!DES:!MD5:!PSK:!RC4;
	ssl_prefer_server_ciphers on;
	access_log /var/log/nginx/access.log;

	location / {
		proxy_set_header Host $host;
		proxy_set_header X-Real-IP $remote_addr;
		proxy_set_header X-Forwarded-For $proxy_add_x_forwarded_for;
		proxy_set_header X-Forwarded-Proto $scheme;
		proxy_http_version 1.1;
    		proxy_set_header Upgrade $http_upgrade;
    		proxy_set_header Connection "Upgrade";
		proxy_pass http://localhost:65000;

}
}
Don’t forget to change the “server_name” to your domain.
Use nginx -t to check if everything goes well. If it shows like this, then everything is fine.
nginx: the configuration file /etc/nginx/nginx.conf syntax is ok
nginx: configuration file /etc/nginx/nginx.conf test is successful
Use systemctl restart nginx && systemctl enable nginx to start Nginx.
And, you are probably good to go! Access your domain and you may see the welcome page!
Note that if you don’t see that, and it says “Connection timed out”, it is probably the firewall blocked your connection. Use `apt purge -y ufw` to disable it
Create a new account, and you are off to the races!
Note that the setup is not completed yet. Go to YOUR_DOMAIN/admin and enter the admin token you have just set up. Configure the SMTP server if you want email notifications, and configure YubiKey and WebAuthn stuff if necessary… There are tons of things to do, I will leave it for you to explore!
The database is located in /vw-data, so you may want to back it up to somewhere safe like hourly or daily. This database is encrypted, so feel free to back it up to some public cloud services like OneDrive, Google Drive, Dropbox, etc.
Conclusion
Hooray! You have just set up a password manager yourself!
In conclusion, in the modern era, where digital security is of utmost importance, using a password manager is highly recommended. It simplifies the management of multiple passwords, enhances security, and reduces the risk of data breaches. For those who seek greater control and privacy, self-hosting a password manager provides an additional layer of protection and customization options. However, it’s essential to carefully evaluate your technical abilities and resources before opting for a self-hosted solution. Regardless of the chosen approach, the use of a password manager is an indispensable tool in safeguarding your online identity and securing your valuable digital assets.