Booting Raspberry Pi From NVMe SSD (but differently)
Intro
Raspberry Pis have always been the go-to platform for geeks to tinker with, but there’s a crucial problem.
For many years, microSD cards were the only storage medium for Raspberry Pis, and, as you may know, they are pretty darn slow. Even the fastest cards, say, SanDisk Extreme Pro, perform better than average cards, but they are still nowhere near even those DRAM-less QLC SSDs.
Fortunately, after the Raspberry Pi 5 came out with a PCIe Gen 2 bus, NVM Express SSDs can now be used on Raspberry Pis.
Problems
I’m not going to talk about any third-party HATs. They may work fine, but the official one should always be the most reliable, right?😅
Here’s the thing: the official HAT only supports 2242 NVMe SSDs, and they aren’t easy to find. Aside from OEM drives, there are very few choices on the market.
I ended up buying a 256 GB KIOXIA BG4, which is a DRAM-less 2242 NVMe SSD.
If you happen to get one that behaves normally, then it should be super easy: copy your root filesystem to the new NVMe SSD, change your fstab, modify your boot sequence, and reboot. Everything should be fine.
But…
The reality is never that easy. In my case, my BG4 refuses to work under PCIe Gen 2. To be more specific, the system won’t recognize it in any way.
brcm-pcie 1000110000.pcie: link up, 5.0 GT/s PCIe x1 (!SSC)
pci 0001:01:00.0: [1e0f:0001] type 00 class 0xffffff PCIe Endpoint
But it works if I set the PCI Express speed to Gen 3, which is not officially certified on the Pi 5 but is supported well enough for testing.
LnkSta: Speed 8GT/s, Width x1
Kernel driver in use: nvme
Everyone who has ever played with Raspberry Pis knows that the official operating system, Raspberry Pi OS (currently Debian Trixie with a modified kernel), puts everything in two partitions: /boot/firmware and /.
The chicken-and-egg problem
To change the PCI Express speed to Gen 3, the Pi bootloader first reads /boot/firmware/config.txt and looks for a line like this:
dtparam=pciex1_gen=3
By default, the system boots with PCIe Gen 2. But this SSD won’t even work unless the PCIe speed is Gen 3, so an NVMe-hosted config.txt is unreadable at the moment when it is needed.
What if…
What if we offload the /boot/firmware partition to the microSD card and relocate the root filesystem to the NVMe SSD?
That’s exactly what I ended up doing.
The final layout looks like this:
microSD p1       -> /boot/firmware
NVMe p1          -> /
NVMe p1 subvol   -> /home
The boot chain becomes:
Raspberry Pi bootloader
  -> reads config.txt from the microSD card
  -> switches PCIe to Gen 3
  -> loads kernel and initramfs from the microSD card
  -> mounts the root filesystem from the NVMe SSD
This avoids the chicken-and-egg problem completely. The Pi no longer needs to read config.txt from a device that does not work at the default PCIe speed.
Migrating the root filesystem
This is not a pure NVMe boot setup. The microSD card is still required, but only for the firmware partition. The operating system itself runs from the NVMe SSD.
Also, the following commands will erase the NVMe SSD. Double-check the device name before running anything destructive.
Preparation
Install the tools first.
sudo apt update
sudo apt install -y btrfs-progs rsync parted initramfs-tools tmux
tmux new -s nvme-root
Check the current disks.
lsblk -o NAME,SIZE,FSTYPE,MOUNTPOINTS,PARTUUID,MODEL
findmnt /
findmnt /boot/firmware
In my case, the NVMe drive was /dev/nvme0n1, the SD card boot partition was /dev/mmcblk0p1, and the current root was still on the SD card.
Partition and format the NVMe SSD
Again, this wipes the NVMe SSD.
sudo umount /dev/nvme0n1p* 2>/dev/null || true
sudo wipefs -a /dev/nvme0n1

sudo parted -s /dev/nvme0n1 mklabel gpt
sudo parted -s /dev/nvme0n1 mkpart primary btrfs 1MiB 100%
sudo partprobe /dev/nvme0n1

sudo mkfs.btrfs -f -L rpi-root-btrfs /dev/nvme0n1p1
I used btrfs here, because if I’m already moving the root filesystem to an SSD, I might as well get snapshots, compression, and subvolumes.
Create btrfs subvolumes
sudo mkdir -p /mnt/nvmeroot
sudo mount /dev/nvme0n1p1 /mnt/nvmeroot

sudo btrfs subvolume create /mnt/nvmeroot/@
sudo btrfs subvolume create /mnt/nvmeroot/@home

sudo umount /mnt/nvmeroot
Mount them back in the final layout:
sudo mount -o noatime,compress=zstd:1,ssd,discard=async,subvol=@ /dev/nvme0n1p1 /mnt/nvmeroot
sudo mkdir -p /mnt/nvmeroot/home
sudo mount -o noatime,compress=zstd:1,ssd,discard=async,subvol=@home /dev/nvme0n1p1 /mnt/nvmeroot/home
Copy the current system
sudo rsync -aAXHv \
  --exclude='/dev/*' \
  --exclude='/proc/*' \
  --exclude='/sys/*' \
  --exclude='/tmp/*' \
  --exclude='/run/*' \
  --exclude='/mnt/*' \
  --exclude='/media/*' \
  --exclude='/lost+found' \
  --exclude='/boot/firmware/*' \
  / /mnt/nvmeroot/
Notice that I did not copy /boot/firmware. That partition stays on the microSD card.
Write the new fstab
This is where I almost shot myself in the foot.
After cloning a root filesystem, /etc/fstab inside the cloned system may still point to the old SD card root partition. If cmdline.txt points to the NVMe root but the cloned fstab still points to the SD root, the boot may partially work and then remount the wrong thing, fail mounts, or drop into a confusing state.
So get the actual PARTUUIDs first:
NVME_PARTUUID=$(blkid -s PARTUUID -o value /dev/nvme0n1p1)
BOOT_DEV=$(findmnt -no SOURCE /boot/firmware)
BOOT_PARTUUID=$(blkid -s PARTUUID -o value "$BOOT_DEV")

echo "$NVME_PARTUUID"
echo "$BOOT_PARTUUID"
Then write /mnt/nvmeroot/etc/fstab:
sudo cp -a /mnt/nvmeroot/etc/fstab /mnt/nvmeroot/etc/fstab.before-nvme-root

sudo tee /mnt/nvmeroot/etc/fstab >/dev/null <<EOF
proc            /proc           proc    defaults                                            0 0
PARTUUID=$NVME_PARTUUID  /              btrfs   defaults,noatime,compress=zstd:1,ssd,discard=async,subvol=@      0 0
PARTUUID=$NVME_PARTUUID  /home          btrfs   defaults,noatime,compress=zstd:1,ssd,discard=async,subvol=@home  0 0
PARTUUID=$BOOT_PARTUUID  /boot/firmware vfat    defaults                                            0 2
EOF
Check it carefully:
cat /mnt/nvmeroot/etc/fstab
The / and /home entries must use the NVMe partition’s PARTUUID, not the old SD root partition’s PARTUUID.
Build an initramfs
For ext4 root this might not be interesting, but for btrfs root this matters.
If btrfs support is built as a kernel module, the kernel needs an initramfs before it can mount the root filesystem. Without it, you can have the NVMe detected perfectly and still fail before / is mounted.
Bind mount the boot partition and system directories into the new root:
sudo mount --bind /boot/firmware /mnt/nvmeroot/boot/firmware
sudo mount -t proc proc /mnt/nvmeroot/proc
sudo mount -t sysfs sys /mnt/nvmeroot/sys
sudo mount --rbind /dev /mnt/nvmeroot/dev
sudo mount --make-rslave /mnt/nvmeroot/dev
Generate the initramfs inside the cloned system:
sudo chroot /mnt/nvmeroot /bin/bash
apt install -y btrfs-progs initramfs-tools
update-initramfs -c -k $(uname -r) || update-initramfs -u -k $(uname -r)
exit
I saw this warning:
W: Couldn't identify type of root file system 'PARTUUID=...' for fsck hook
For this setup it was not the real problem. The important line was:
'/boot/initrd.img-...' -> '/boot/firmware/initramfs_2712'
That means the initramfs was copied to the firmware partition, where the Raspberry Pi firmware can find it.
Make sure it exists:
ls -lh /boot/firmware/initramfs_2712
Configure the SD card boot partition
Now make sure /boot/firmware/config.txt contains both of these:
dtparam=pciex1_gen=3
auto_initramfs=1
You can append them like this:
grep -q '^dtparam=pciex1_gen=3' /boot/firmware/config.txt || \
  echo 'dtparam=pciex1_gen=3' | sudo tee -a /boot/firmware/config.txt

grep -q '^auto_initramfs=1' /boot/firmware/config.txt || \
  echo 'auto_initramfs=1' | sudo tee -a /boot/firmware/config.txt
For my BG4, dtparam=pciex1_gen=3 is the whole point. Without it, the drive appears broken:
pci 0001:01:00.0: [1e0f:0001] type 00 class 0xffffff PCIe Endpoint
With Gen 3 forced, it becomes a normal NVMe device:
LnkSta: Speed 8GT/s, Width x1
Kernel driver in use: nvme
Point cmdline.txt at the NVMe root
Back up the current kernel command line:
sudo cp -a /boot/firmware/cmdline.txt /boot/firmware/cmdline.txt.sdroot.bak
Then edit it:
sudo nano /boot/firmware/cmdline.txt
Keep it as one single line. Replace the old root=... with the NVMe PARTUUID, and make sure these options are present:
root=PARTUUID=<NVMe PARTUUID> rootfstype=btrfs rootflags=subvol=@,compress=zstd:1,ssd,discard=async rootwait
For example, mine looked like this in the middle:
root=PARTUUID=097fd87d-9abd-47e1-86bf-dddbc5815c6e rootfstype=btrfs fsck.repair=yes rootwait quiet splash plymouth.ignore-serial-consoles rootflags=subvol=@,compress=zstd:1,ssd,discard=async
The exact console and splash parameters can differ. The critical parts are:
root=PARTUUID=<the actual PARTUUID of /dev/nvme0n1p1>
rootfstype=btrfs
rootflags=subvol=@,compress=zstd:1,ssd,discard=async
rootwait
Before rebooting, compare everything one more time:
blkid /dev/nvme0n1p1
cat /boot/firmware/cmdline.txt
cat /mnt/nvmeroot/etc/fstab
grep -nE 'pciex1_gen|auto_initramfs' /boot/firmware/config.txt
The PARTUUID in cmdline.txt and the PARTUUID used for / in /mnt/nvmeroot/etc/fstab must match.
Reboot
Unmount everything cleanly:
sync
sudo umount -R /mnt/nvmeroot
sudo reboot
After reboot:
findmnt /
findmnt /home
findmnt /boot/firmware
lsblk -o NAME,SIZE,FSTYPE,MOUNTPOINTS,PARTUUID
cat /proc/cmdline
dmesg -T | grep -Ei 'pcie|nvme|link up'
The expected result is:
/              -> /dev/nvme0n1p1, btrfs subvol=@
/home          -> /dev/nvme0n1p1, btrfs subvol=@home
/boot/firmware -> /dev/mmcblk0p1
And the PCIe link should show:
link up, 8.0 GT/s PCIe x1
At this point the microSD card is only a boot helper. The root filesystem, /home, package installation, logs and most random writes are on the NVMe SSD.
Benchmark
Was it worth the trouble? Absolutely.
I ran a few simple fio tests on both the KIOXIA BG4 and the microSD card. The microSD card here is a 128 GB SanDisk Ultra. This is not a lab-grade benchmark, and the test parameters were not identical for both devices. The NVMe tests used iodepth=32; the SD card tests used iodepth=16, because waiting for an SD card to suffer is not my hobby. Still, the result is clear enough.
The sequential tests used 1 MiB blocks. The random tests used 4 KiB blocks.
| Test | NVMe throughput | NVMe IOPS | microSD throughput | microSD IOPS |
|---|---|---|---|---|
| Sequential read | 853 MiB/s | 853 | 76.1 MiB/s | 76 |
| Sequential write | 723 MiB/s | 722 | 28.3 MiB/s | 28 |
| Random read | 794 MiB/s | 203k | 14.2 MiB/s | 3,629 |
| Random write | 248 MiB/s | 63.6k | 2.7 MiB/s | 695 |
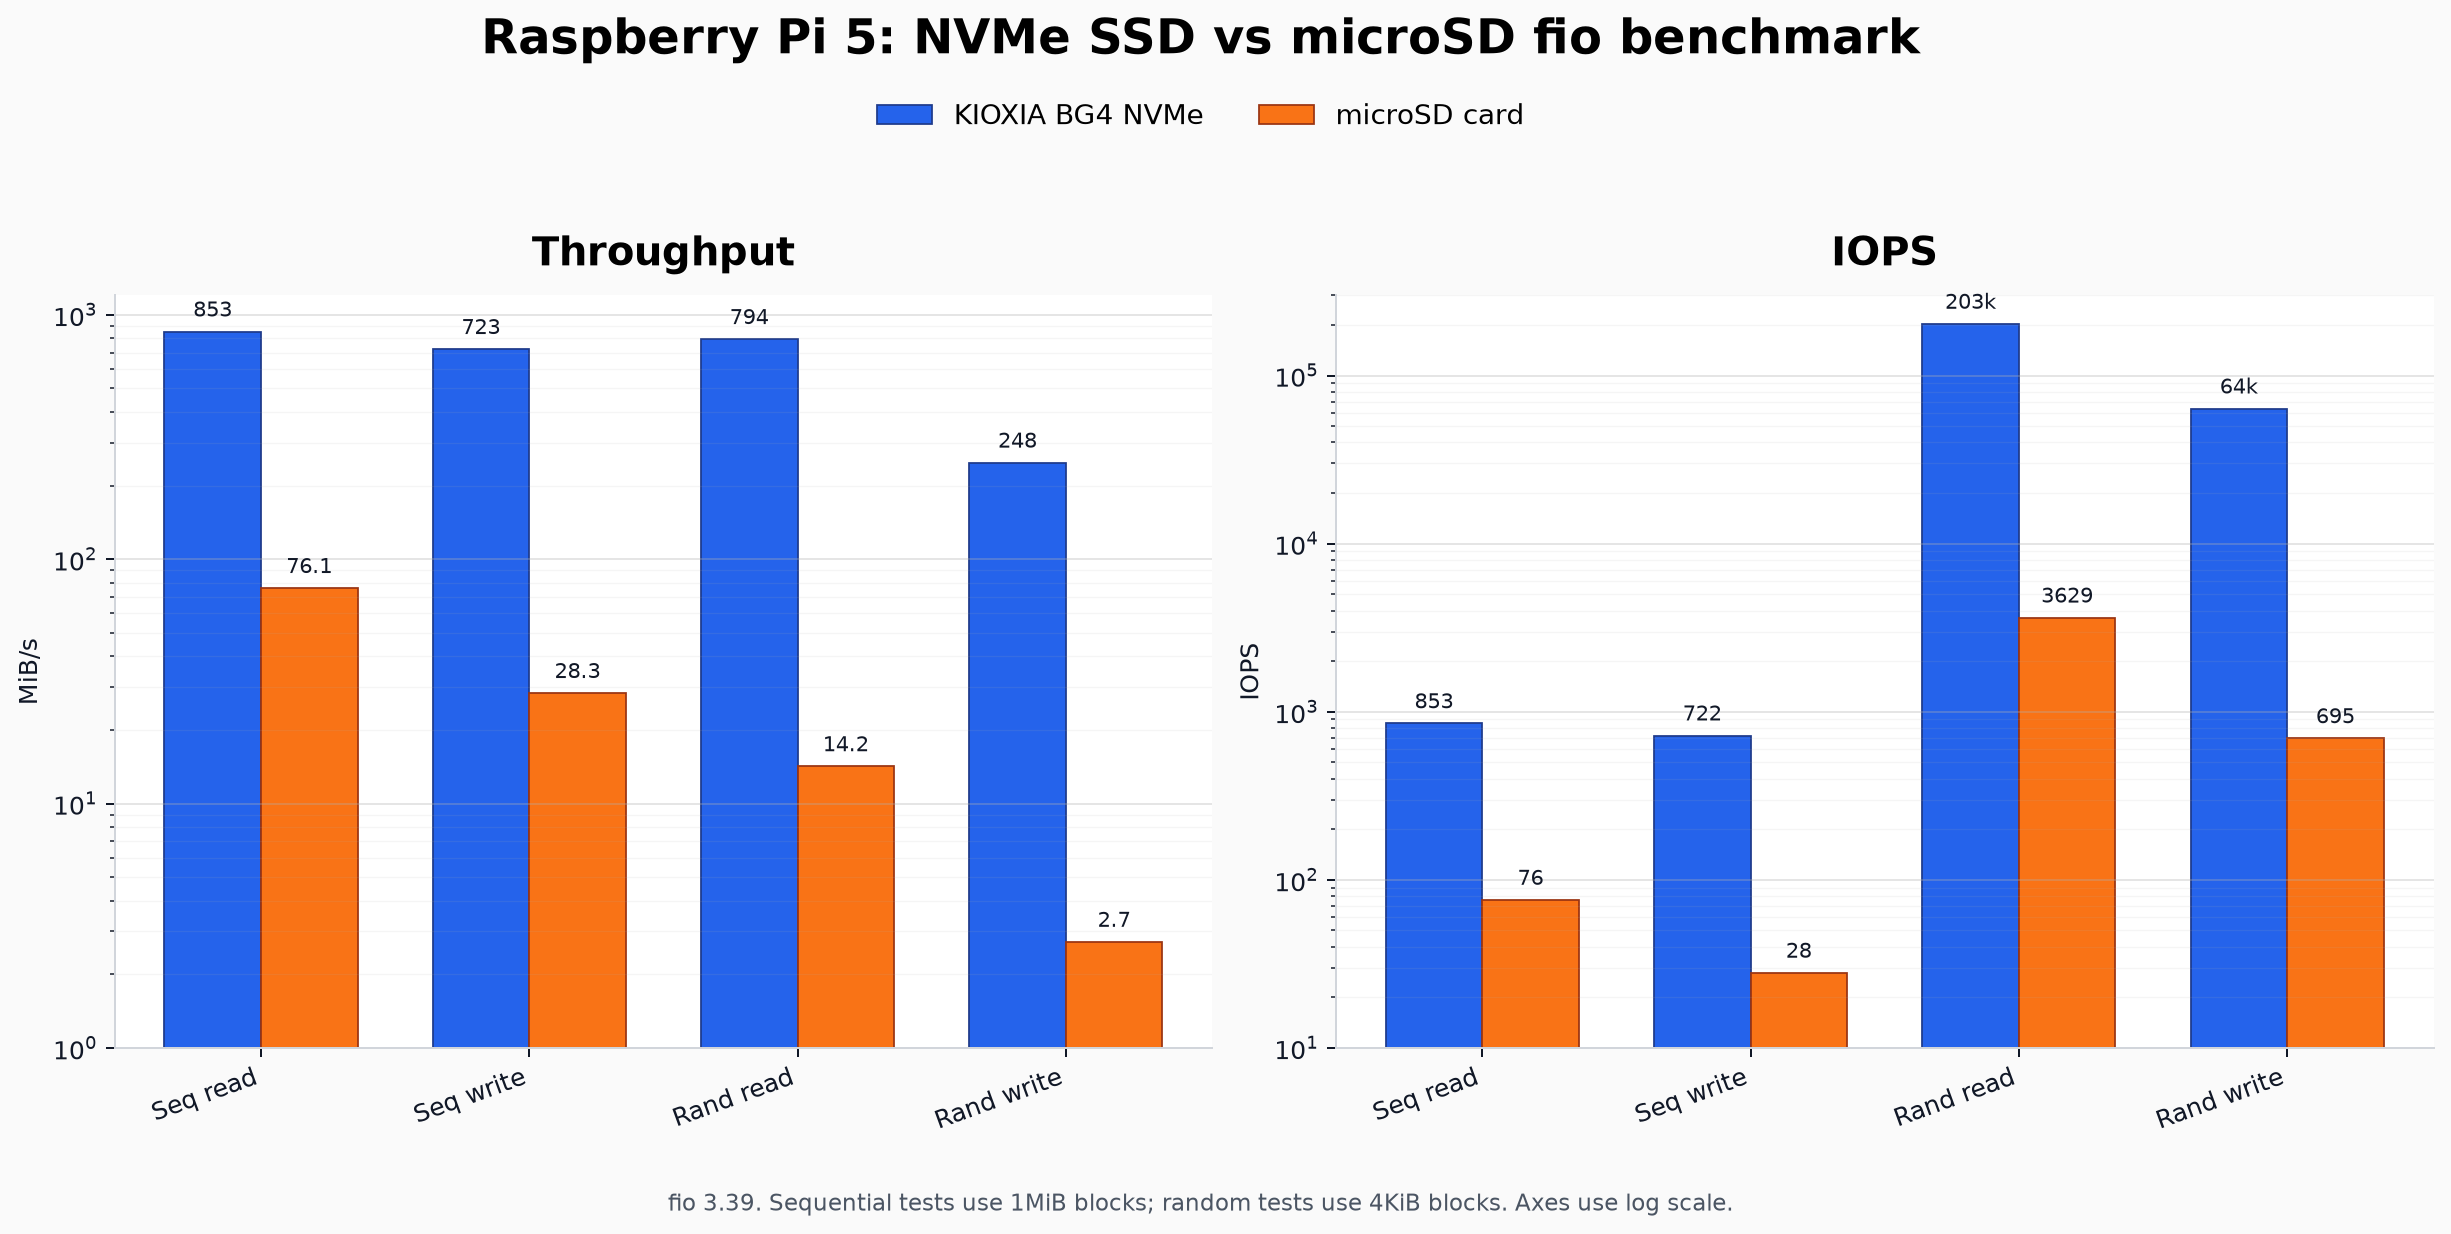
The random write result is the one that matters the most to me. Package installation, logging, database writes, browser cache, and random system updates are exactly the kind of workload where SD cards feel miserable. The NVMe SSD is not just faster in a benchmark; it makes the Pi feel like a real small server instead of a development board waiting on flash storage.
Optional cleanup
The second partition on the SD card is now the old root filesystem. I suggest leaving it alone for a while. It is a very convenient rescue system.
If the NVMe root fails to boot, you can restore the old command line:
sudo cp -a /boot/firmware/cmdline.txt.sdroot.bak /boot/firmware/cmdline.txt
sudo reboot
Once the setup has been stable for a while, you can reuse the old SD root partition, or resize the firmware partition to something like 1 or 2 GB. In my case the firmware partition was only using a small part of its space, so this was not urgent.
Conclusion
This is not the cleanest possible Raspberry Pi 5 boot setup, but it is the most practical one for this SSD.
Pure NVMe boot failed because the BG4 needs PCIe Gen 3 to behave correctly, while the bootloader starts from a state where it cannot yet read the NVMe-hosted config.txt that would enable Gen 3. Moving /boot/firmware back to the microSD card fixes that ordering problem.
So the final answer is: boot from SD, run from NVMe.
It’s slightly inelegant, but honestly, it works beautifully.
Acknowledgements
This post is mostly written by human (100% carbon-based human), assisted by OpenAI Codex (GPT-5.5 medium). Ironically the solution itself came to my mind a long time ago but wasn’t actually realized until ChatGPT gave me detailed instructions lol. 😁